

The sky’s the limit when it comes to the tie dye patterns you can try out. Each of them lends your old and boring clothes a newer look by colorfully reinventing them. If you’re someone who loves something classic, specific patterns will suit you well.
Talking about myself, for instance, I’ve tried out hundreds of tie dye patterns so far. While some came out far better than I initially expected, others aren’t worth discussing here.
Hence, you must choose the best tie-dye pattern that doesn’t disappoint. And this article is based on that! Here are my favorite tie dye patterns with their step-by-step guide, from the easiest ones to the more advanced patterns I resort to at times.
Let’s start then!
I have an article that explains how to make your own tie-dye liquid if you’re interested.
How Do You Get Different Tie Dye Patterns?
The most straightforward trick to get different tie dye patterns is folding and tying the target fabric in multiple ways. This way, you’ll get a new design every time.
How Do You Tie Dye A Crumple Pattern?
The crumple pattern is the most uncomplicated one out there. And the result is always vibrant and unique! Follow these simple steps to make your crumple tie dye design.
Essentials Needed
- A table cloth
- Fabric dye
- Gloves
- Rubber bands
- Spray bottle
- Any white cotton fabric
- Plastic bags (to prevent any mess!)
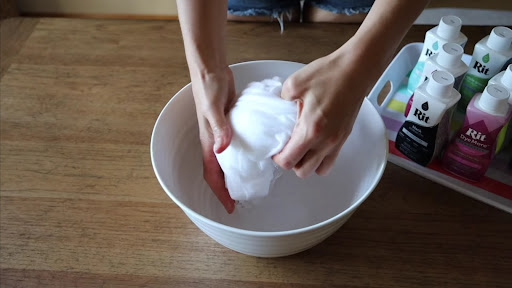
Prepare The Work Area
To avoid messing up the floor or the table, lay a tablecloth before starting with your project. Also, wear gloves to protect your hands from being stained.
Prepare your dye
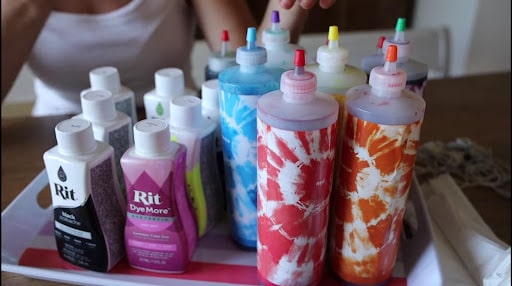
Prepare the dye in a bowl according to the directions given on its packaging. Mix it well to get an even shade. If you’re looking for a deeper shade, it’d be better to add more dye. For a pastel shade, add less coloring. You can then store the mixture in a spray bottle or a squeeze bottle for later use. You can also use food coloring as a tie-dye agent.
Pattern
Before starting with the design:
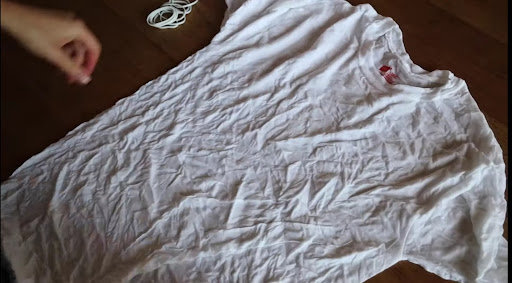
- Make sure that your clothes are damp. It shouldn’t be dripping wet to soak up all the dye.
- Place your fabric on a flat surface.
- Crumple up parts of the material into small balls.
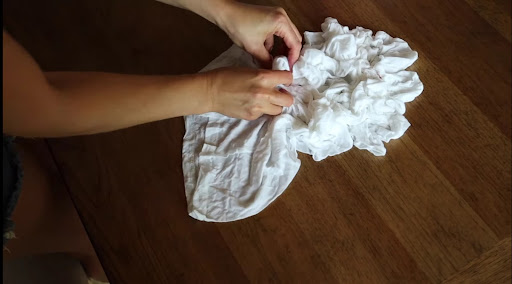
- Secure the ball-shaped fabric with rubber bands to keep them in place. 4 bands usually do the trick.
Note: The tighter you crumple them and secure them, the more white areas will be undyed.
Apply The Dye
Place the fabric with rubber bands on the floor and use spray bottles or squeeze bottles to dye it. Make sure to soak the cloth in dye thoroughly. After dyeing one side of the material, flip it to the other side and dye it on the other side.
After you have stained the fabric, let it sit for a minimum of 24 hours by keeping it in a plastic bag.

Rinse & Dry
After your fabric has dried thoroughly, take it out from the plastic bag and remove all multiple rubber bands. Wash the dyed fabric under cold water.
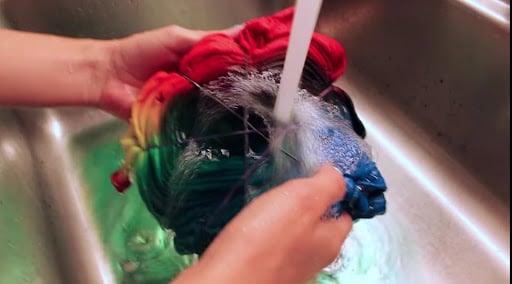
Make sure to wash the cloth thoroughly until the water runs clear. You can then air dry it as usual by hanging them.
How Do You Crumple Tie Dye With Multiple Colors?
You can also crumple tie-dye your fabric using many different colors. It will give a better look to the material than using a single color. Once you’ve crumpled up your fabric and secured it with some rubber bands, start with the process of dyeing your fabric with multiple colors.
Use a squeeze bottle or a spray bottle to make this process easier. First, start by adding the base colors to the material. After that, ascend with the other colors from light to dark. Play around with the fabric by ascending the colors. It will also let you dye the fabric more freely.
It will create more dyed spots on your fabric. You can also open a few of the folds so that the dye can penetrate a bit deeper into the fabric bundle. You can also use your hands for the dye to penetrate the fabric.
Tip: Do not be too afraid to add the colors of your choice to the fabric, but at the same time, don’t add more colors to the material. Otherwise, you’ll end up getting a muddy finish.
Once you’re done with the dyeing process, let your fabric dry for a minimum of 24 hours. You can rinse the cloth to remove the excess dye and dry it as usual.
How Do You Swirl Tie Dye?
Swirl tie dye is one of the classic patterns. It’s a trendy design used chiefly on t-shirts, shirts, or hoodies. I’ve given you all the information about the swirl tie dye that you can follow to design your clothes.
Supplies required
- Tub of water
- Squeeze bottles
- Rubber bands
- Plastic sheet
- Metal rack
- Gloves
- Apron
- Plastic wrap
Step 1:
Before folding the fabric, ensure that your material is damp so it folds easily. First, place your cloth on a flat surface and pinch a small part of your fabric from the center with your thumb and index finger.
Step 2:
Now, slowly start twisting your fabric to form a swirl. Use your other hand to control the material as it includes the spirals and makes sure that the fabric is close to the floor and not towering. Once you’ve reached the fabric’s end, push all the leftover fabric to complete the spiral, mainly the sleeves of the t-shirts or shirts.
Step 3:
Once the fabric is made into a swirl forming a large circle, secure the fabric with some rubber bands to ensure that the material is in place. It should look like a sliced pizza after connecting it with multiple rubber bands.
You can add rubber bands according to the number of colors you want on your fabric. If working with heavy clothes, you will have to add rubber bands horizontally and vertically to stay in place.
Step 4:
Now, you can start adding your dye to the fabric. For the best results, add a color of your choice for each slice. Make sure to flip the material and add the same color on the other side. It will give you the results of a perfect spiral!
Step 5:
Use only those colors that blend well in the spiral tie dye pattern. If you place colors that won’t go with each other, it’ll give you a muddy finish, making your fabric less attractive. Also, make sure to provide plenty of space between each color to have room to bleed.
Step 6:
Finally, rinse all the extra dye from the fabric and air dry it.
Tie Dye Folding Techniques
Here, I’ve rounded up my top-ranked yet simple folding techniques to try out. You need to follow the steps I have mentioned below to do so.
Rainbow Design
- Place the damp fabric on the floor flat.
- Outline a rainbow from the bottom of the material, followed by the second line parallel to the first.
- Start folding the fabric along the lines, making it a straight line.
- Secure it with some rubber bands.
- Do the same for the second line.
- Now, add the dye. If you want to keep more area white, be careful while dyeing the fabric.
- Use a rack for the extra dye to drip down.
- Rinse and show off your rainbow pattern!
Shibori Design
- Fold the fabric in half lengthwise.
- Again, fold the fabric in half to create a long narrow rectangle.
- Fold the material into small triangles to the top, resembling a paper fan.
- Secure the folds with some rubber bands.
- Add the dye to any of the three edges on the outside of the triangle. Make sure the dye soaks into all the corners.
- Rinse after the 24-hours resting period and wear.
Ombre Design
- Place the fabric flat on the table or floor.
- Put some dye on the bottom of the fabric in a line and brush the dye in an upward direction until it fades.
- Apply some water on the material and brush the dye in an upward direction to give an ombre look.
Galaxy Tie Dye Pattern
The galaxy tie dye pattern can be achieved using a tie-dye liquid or bleach. Use bleach for dark-colored fabric and tie dye liquid for white or light-colored cloth.
Follow these simple steps to achieve the galaxy tie dye pattern.
- First, twist your fabric by pinching it in the middle of the material to make a swirl pattern.
- Either spray the bleach solution (mix water and bleach to the ratio of 1:1) or tie dye liquid using a spray bottle.
- Evenly spread the bleach or tie dye to the material as you keep twisting your fabric.
- After spraying the dye, completely untwist the fabric and see if it’s done correctly.
- Once the fabric is done to your liking, thoroughly wash away all the bleach from the material.
- If you’ve used only bleach, you can spray the rainbow colors onto the fabric.
- Then, wash it in cold water and air dry it as usual.
Advanced Tie Dye Techniques
Have you been tie dyeing for a long time now? If yes, here are some advanced techniques to check out.
Marble Tie Dye Technique
- Choose different areas on the fabric. Then, wrap a marble in that area using a rubber band.
- To simplify this design, I suggest wrapping a few marbles. If you want a vibrant result, go ahead with more marbles.
- Use marbles of different sizes for a dramatic effect.
- For every marble, wrap a circle that will bulge out, and around that, it’ll be dyed.
- You can use a squeeze bottle to apply the dye to the preferred area.
- Either use a single color for all or use different colors of your choice by looking into the color palette.
Bullseye Tie Dye Technique
- Pinch the center of the fabric and pull it up, forming a cone.
- Then, keep wrapping the fabric with a rubber band on a regular gap.
- Wrap all the to the bottom of the fabric on a regular gap.
- Either use a squeeze bottle or a cup to apply the dye to the fabric.
- Apply the dye color of your choice. You can alternate between two to three colors or follow a rainbow pattern to dye the fabric.
- Make sure to apply the particular color all over the section.
- Choose colors that will go along well when applied. Otherwise, you’ll end up getting an unclean finish.
- Dry, rinse, and your bullseye tie dye pattern will be ready.
The Symmetrical Heart
- Locate the center line vertically, where you like the heart design to be placed on the fabric. And then fold the fabric vertically along this line.
- Using a water-soluble marker, trace the heart on the fabric to keep the centerline in the middle.
- With the fabric folded, secure it with some rubber bands in the other material area after drawing the heart.
- Use your color dye your desire to get a symmetrical heart.
Tie Dye Patterns With Bleach
The bleach tie dyeing technique is for dark-colored clothes. It is because it does reverse dyeing. The basic steps are the same as tie dyeing a piece of fabric with tie dye colors.
Safety tip: Be careful while working with bleach as it is harmful to your skin.
Supplies required
- Any dark-colored fabric
- Liquid Bleach
- Gloves
- Rubber Bands
- Spray Bottle
- Water
- Plastic wrap
With all the required supplies collected, here are some unique patterns to work around.
Flag pattern
- Fold your fabric lengthwise into half and again fold it in half.
- Then, fold the material into a continuous triangle from the bottom to the top.
- The second triangle has to be tucked beneath the first triangle to be piled on top of each other.
- Continue folding the fabric front and back until the fabric becomes one big triangle.
- Secure the material with some rubber bands. Put multiple rubber bands tight to avoid bleeding from the bleach.
- You can spray the bleach solution on the material to create the fag pattern.
Accordion Fold Pattern
- This is similar to the flag fold except that it’s a rectangle for the triangle.
- You can start by folding from the bottom and alternate the fold front and back.
- Continue doing the same until the whole fabric is made into a thick rectangle.
- Now, secure the material with some rubber bands.
- Repeat the same folding method for the sleeves and connect it with rubber bands to keep the folds intact.
- Directly spray the bleach solution on the fabric to create the accordion fold pattern.
Pole Wrapping Method
- This pole wrapping method method creates uneven folds instead of straight lines.
- First, fold your fabric lengthwise in half.
- Take an old glass bottle and wrap the fabric onto the glass bottle.
- Secure the material with some twine to tightly sit on the bottle.
- The twine creates the crease. Use more or less twine according to your choice.
- Finally, scrunch the fabric together and spray the bleach to create beautiful patterns.
Complicated Tie Dye Patterns
Some patterns are quite complicated and require patience. I’ve summarized a few of them in this section’s simplest manner possible for you guys.
Corner Bullseye Tie Dye Pattern
- This particular design is similar to the regular bullseye pattern. But instead of doing the bullseye in the center, we’ll do it in the corner this time.
- Pinch a part of the fabric in any one of the corners of the material where you want to create the pattern.
- Then, form a cone with the fabric & secure the cone with some rubber bands.
- Dye the material either using a single color or multiple colors.
- Dry, wash, and wear!
Rainbow Stripes Tie Dye Pattern
- Accordion fold your fabric and wrap it with rubber bands to secure the folds. The rubber band should be placed evenly with regular gaps.
- Now, dye the material using the rainbow colors in each section by alternating between them.
- Make sure to push the dye to the sides of multiple rubber bands for the colors to blend and avoid the white (undyed) parts.
- Dry, wash and flaunt your rainbow stripes tie dye pattern.
Two-Toned Stripes Tie Dye Pattern
- You can make your fabric look extraordinary by using this technique.
- Fold your fabric in half, either lengthwise or widthwise.
- Dye one side of the material and the other side of the fabric in another color.
- Use colors that go well with each other to avoid a muddy finish.
- Dry, wash, and wear!
Conclusion
So, here you go. I hope this article will help you find the correct pattern for your fabric, and give an idea of how to proceed with the complicated ones. I’ve been tie dyeing for quite a long time now and can swear that the patterns above are worth your efforts. So, do try them.
The post How To Do Different Tie Dye Patterns? The Illustrated Guide appeared first on Art & Craft, DIY ideas and Tutorials - Craftbuds.